Step 1:
Using tenant administration account login to Microsoft portal at: https://login.microsoftonline.com
Step 2:
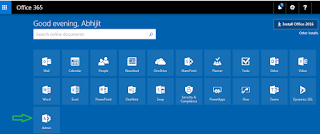
You would be able to see different tiles as below. This might look different in your case based on license and your role in the tenant. Go to Office 365 admin center by clicking on the "Admin" tiles as below.

You can also navigate to the admin center using the app launcher and clicking on "Admin" tiles.
Step 3:
Now you need to navigate to SharePoint admin center by mouse hovering on the "Admin" tiles in left navigation menu and clicking on the SharePoint link as shown below.
Step 4:
It would take you to the SharePoint admin center and by default site collection tab would be selected.
Go to the drop-down menu in "New" and click "Private Site Collection".
Step 5:
This would bring new site collection window and you have to provide:
Step 6:
Once everything is filled up, you can click on the "OK" button. SharePoint would take a short while to create and it would be listed under site collections. Then click on your specific site collection Url, it would bring a popup with the details and you can click on the Url listed against "Web Site Address".
There it is, your site is ready !!!
We can create a site collection using PowerShell as well. In my next post we will see how to create a SharePoint online site collection using PowerShell.

You can also navigate to the admin center using the app launcher and clicking on "Admin" tiles.
Step 3:
Now you need to navigate to SharePoint admin center by mouse hovering on the "Admin" tiles in left navigation menu and clicking on the SharePoint link as shown below.
Step 4:
It would take you to the SharePoint admin center and by default site collection tab would be selected.
Go to the drop-down menu in "New" and click "Private Site Collection".
Step 5:
This would bring new site collection window and you have to provide:
- Title: It's the title of your site collection that gives. In my case I have provided "My Daily SharePoint Team Site".
- Web Site Address: This defines the Url of your site collection. I have typed "mydailysharepoint". So it would look like: https://somename.sharepoint.com/sites/mydailysharepoint
- Template: Template is going to tell SharePoint what are the features and functionality needs to be included in the site. For example, if you are creating it for your team collaboration you would select "Team Site" template, if you are creating it for posting some thoughts, ideas, views, experience then you would select "Blog" template. Like this SharePoint provides number of templates and you can select as per your need.
- Time Zone: Time zone that is going to be used by this site. I have selected UTC+5:30 for maintain Indian standard time.
- Administrator: Administrator is the user who is having supreme power to change any settings, set permission and access, add restrictions, enable disable feature etc. for this site collection. So you have to provide the user account who needs to be the administrator.
- Server Resource Quota: The main purpose of resource quotas is to limit the risk that sandboxed custom code can have on available resources on a site collection. By default it's 300, if you are sure that no sandboxed code would be running on this site collection, it can be set to 0.
Step 6:
Once everything is filled up, you can click on the "OK" button. SharePoint would take a short while to create and it would be listed under site collections. Then click on your specific site collection Url, it would bring a popup with the details and you can click on the Url listed against "Web Site Address".
There it is, your site is ready !!!
We can create a site collection using PowerShell as well. In my next post we will see how to create a SharePoint online site collection using PowerShell.


No comments:
Post a Comment